Shared Source Initiative > Troubleshooting Code Center Premium and Debugging > Debugging
How to: Debug with Code Center Premium Source (Visual Studio 2010)
This article is an extensive update to the MSDN article of the same name.
Thanks to Microsoft C++ MVPs Jim Beveridge and John Czopowik for this
update. The majority of the content below originally appeared on Jim
Beveridge’s technical blog.
These instructions are for
developers who have a Windows Shared Source Initiative source code
license and access to Code Center Premium.
To prepare for debugging with Code Center Premium and Visual Studio 2010
- Close all copies of Visual Studio that are running (this is required or VS will overwrite your registry changes.)
- Connect your smart card reader and insert the card you obtained from the Shared Source Initiative.
- If needed, see http://www.microsoft.com/en-us/sharedsource/troubleshooting-code-center-premium.aspx for instructions on how to get the latest Gemalto driver for your smart card reader.
- Make sure your smart card certificate is working by opening Internet Explorer and going to https://codepremium.msdn.microsoft.com/.
You should see prompts as shown in Steps 3 to 6 under Sample
Walkthrough, below. This must work properly before you proceed with
these instructions. Not all browsers support smart cards, so first try
this with Internet Explorer.
- Open the Registry Editor and go to:
HKEY_CURRENT_USER\Software\Microsoft\VisualStudio\10.0\Debugger - Set both SecureSourceLocalDirectory and SourceServerExtractToDirectory to the same directory. The directory does not have to already exist.
- Launch Visual Studio.
- On the Tools menu, click Options.
- In the Options dialog box, open the Debugging node and click General.
- Clear the Enable just my code (Managed only) check box.
- Select Enable Enable source server support.
- Select Print source server diagnostic messages to the Output window.
- Clear Require source files to exactly match the original version.
- Under the Debugging node, click Symbols.
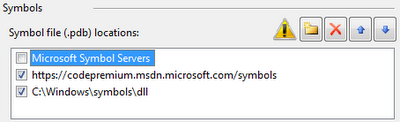
- In the Symbol file (.pdb) locations box, clear the Microsoft Server Symbols check box and add the following location:
https://codepremium.msdn.microsoft.com/symbols
Move
this location to be second in the list to ensure that these symbols are
loaded first. (You can't move it to the top. Microsoft Symbol Servers
is always first, but you should have unchecked it.) In the screen shot
below, note the third entry in this list, C:\Windows\symbols\dll. This
directory is where the MFC and C run-time symbols are installed by
Visual Studio. These symbols are not part of Code Center Premium, so you
need to include them if you want to debug into MFC or the C run-time
library.
- In the Cache symbols in this directory
box, enter a location such as C:\symbols where Code Center Premium can
cache the symbols. This location should be DIFFERENT from the location
used to store public symbols when Microsoft Symbol Servers is checked
because symbols already downloaded from the Microsoft Symbol Servers
will prevent symbols being downloaded from Code Center Premium.
- Click OK.
- Right-click the Solution under Solution Explorer and choose Properties:

- Under Common Properties, select Debug Source Files.
- Add a link for the desired operating system (complete list at the end of this article.) For example:
https://codepremium.msdn.microsoft.com/source/Windows%207/RTM
Note that spaces must be replaced with %20, and you cannot browse to this location in your browser.

- In the same window, make sure that the list under "Do not look for these source files" is empty.
- Click OK.
- Close and restart Visual Studio to ensure that settings are persisted.
Sample Code
Here is sample code that I used for testing. It's a native code console application that can be tested under x86 or x64:
#include "stdafx.h"
#include <windows.h>
#include <shlwapi.h>
#pragma comment(lib, "shlwapi.lib")
int _tmain(int argc, _TCHAR* argv[])
{
// Can't step into this function. You get a "not indexed" error.
//char buf[256]={'\0'};
//::PathRemoveExtensionA(buf);
// Set a breakpoint on this function, then try to Step Into it.
GetConsoleMode(0,0);
// Stepping into this function should work too, but not on XP.
//UnregisterApplicationRestart();
return 0;
}
Sample Walkthrough
- Set a breakpoint at GetConsoleMode in the sample code.
- Start debugging (F5).
- You should see the Confirm Certificate window. If not, your smart card isn't working.
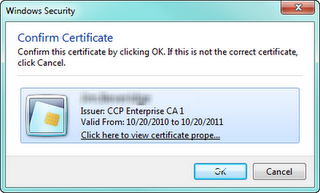
- Click OK.
- You'll be asked to enter your PIN. You received this in your email confirmation that welcomed you to Code Center Premium.
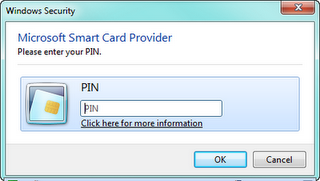
- Enter your PIN and click OK.
- It
may take a while to get started because the private symbols must be
downloaded. Since they contain full debug information, they are much
larger than the usual symbols.
- When Visual Studio stops at the
breakpoint, look at your Modules window. Here's how it appears on my
Windows 7 64-bit machine: (click it to see it full size.)

- Note
that kernel32.dll shows "Symbols loaded", whereas KernelBase.dll shows
"Symbols loaded (source information stripped). If kernel32.dll also
shows "(source information stripped)", then you are using the wrong
symbols. The most likely cause is if you didn't set a different cache
directory for private symbols.
- Also note that the timestamp for
both kernel32.dll and KernelBase.dll is 7/13/2009. This means that they
are RTM DLLs for Windows 7. The timestamp for ntdll.dll is 3/23/2010,
which means that it's been updated and you can't step into it. So it is possible to debug on a patched system, but it's hit or miss because many DLLs have been patched and so can't be stepped into.
- Now you will see a window asking to execute an untrusted command named SD.EXE:
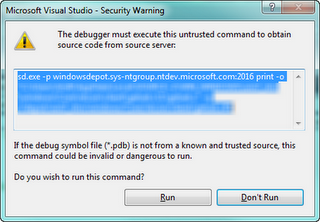
- This
command will be executed by the Source Server at Code Center Premium.
It will NOT be executed on your computer. You do not need to have SD.EXE
on your computer.
- Click Run.
- You should now be looking at Windows source code.
- If you look at the Output window, you should see messages such as the following: (some NDA information removed.)
SRCSRV: sd.exe -p windowsdepot.sys-ntgroup.ntdev.microsoft.com:2016
print -o
"C:\Users\JimB\AppData\Local\SOURCE~2\WIN_WINDOWS\win7_rtm\windows\yyy\yyy\yyy\yyy.c\1\yyy.c"
-q //depot/win7_rtm/windows/Core/xxx/xxx/xxxxx.c#1
SRCSRV:
Source server cannot retrieve the source code for file
'd:\w7rtm\windows\zzz\zzz\zzz\zzz.c' in module
'C:\Windows\System32\kernel32.dll'. The system cannot find the file
specified.
- Note that Source Server is actually showing an error. In spite of this, debugging still works properly.
Things That Don't Work
Troubleshooting
Everything has to be exactly right for source code debugging to work properly. If things aren't working, here are some ideas:
- Is your smart card working? (Repeat Step 4 under Prepare for debugging, above.)
- Did
Visual Studio overwrite your registry entries? This usually leads to
the error "SRCSRV: ... The system cannot find the file specified."
(Repeat Step 5.)
- Did the file get added to the list of Do not look for these source files? (See Steps 18 through 22.)
- Are
you debugging a 32-bit app on 64-bit Windows? You can't debug Windows
source in this case. Run the 32-bit code on a 32-bit version of Windows
in a virtual machine and use Remote Debugging.
- Are you trying
to step into the Windows kernel? Kernel debugging is different from user
mode debugging. You must use WinDbg for kernel mode debugging.
- Is
the source code missing on Code Center Premium? This would be the case
if you are getting the error SRCSRV: ... not indexed. Please see the
section below titled ANSI versus Unicode Functions.
- Are you seeing a warning about an "Untrusted Command"? This is normal. Just click Run.
- Can't
step into a Windows API function? Make sure you have symbols for the
DLL. Look in the Modules list and make sure that it does NOT say "Source
information stripped." If it does, clear your symbol cache and run your
app again.
Running Visual Studio in a Virtual Machine
You
can install Visual Studio 2010 on your Windows 7 clean machine and run
Visual Studio 2010 in the virtual machine so you don't have to use
remote debugging. However, you must use a virtual machine that supports
USB devices, such as VMware or Virtual PC in Windows 7. Virtual PC 2007
will not work (not even with SP1.)
In Virtual PC on Windows 7, go
to the USB menu and select USB Smart Card Reader. You will be prompted
to install the drivers in the virtual machine. The smart card will be
DISCONNECTED from the host system, so you will not be able to use it in
the host machine until the virtual machine releases it.
You do not need to do this if you are using Remote Debugging to run your application in the virtual machine.
ANSI versus Unicode Functions
Debugging
into the "A" and "W" versions of functions frequently doesn't work.
Here is the explanation from C++ MVP Jochen Kalmbach:
The problem
with " PathRemoveExtensionA" seems to be a "build feature". They
implemented the file only once for A and W and then you use this file
without "A, W"... In this case, the source file is called "path.c" and
is referenced as "patha.c" (A) and "pathw.c" (W).
If you want to
debug into this file, copy the source from the CCP-Website for the
"TCHAR" version and save it wherever you want with the name "patha.c"
and/or "pathw.c". Then if VS asks you for the file, you can just use
this file. It will exactly match.
It seems that this file is
generated during the build-process, because it seems that it is also
compiled from the output directory...
Source Server Paths
(Thanks again to C++ MVP Jochen Kalmbach for providing this list.)
Here
is the list of all currently available source server paths. Links are
not clickable because these links are only for use in Visual Studio, not
in your browser.
Win7 RTM: https://codepremium.msdn.microsoft.com/source/Windows%207/RTM
Win7 SP1: https://codepremium.msdn.microsoft.com/source/Windows%207/SP1
W2k8 RTM: https://codepremium.msdn.microsoft.com/source/Windows%20Server%202008/RTM
W2k8 Hyper-V-RTM: https://codepremium.msdn.microsoft.com/source/Windows%20Server%202008/Hyper-V%20RTM
W2k8 SP2: https://codepremium.msdn.microsoft.com/source/Windows%20Server%202008/SP2
W2k8 R2: https://codepremium.msdn.microsoft.com/source/Windows%20Server%202008/R2
W2k3 RTM: https://codepremium.msdn.microsoft.com/source/Windows%20Server%202003/RTM
W2k3 R2: https://codepremium.msdn.microsoft.com/source/Windows%20Server%202003/Windows%20Server%202003%20R2
W2k3 SP1: https://codepremium.msdn.microsoft.com/source/Windows%20Server%202003/Windows%20Server%202003%20SP1%20RTM
W2k3 SP2: https://codepremium.msdn.microsoft.com/source/Windows%20Server%202003/Windows%20Server%202003%20SP2%20RTM
Vista RTM: https://codepremium.msdn.microsoft.com/source/Windows%20Vista/RTM
Vista SP1: https://codepremium.msdn.microsoft.com/source/Windows%20Vista/SP1
Vista SP2: https://codepremium.msdn.microsoft.com/source/Windows%20Vista/SP2
XP RTM: https://codepremium.msdn.microsoft.com/source/windows%20XP/RTM
XP SP1: https://codepremium.msdn.microsoft.com/source/windows%20XP/SP1
XP SP2: https://codepremium.msdn.microsoft.com/source/windows%20XP/SP2
XP SP3: https://codepremium.msdn.microsoft.com/source/windows%20XP/SP3
W2k Datacenter RTM: https://codepremium.msdn.microsoft.com/source/Windows%202000/Datacenter%20RTM
W2k SP3: https://codepremium.msdn.microsoft.com/source/Windows%202000/SP3
W2k SP4: https://codepremium.msdn.microsoft.com/source/Windows%202000/SP4